This directory recaps all the MemoQ-related publications made on Loc’d and Loaded, as well as a few bonuses. Enjoy!
Extra resources
Auto-translate filters
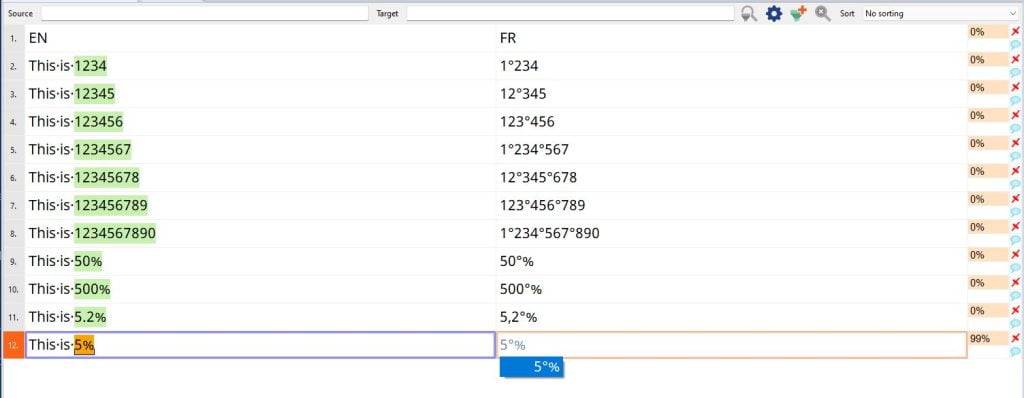
Auto-translate filters are a great way to “convert” certain types of symbols or numbers into the target format of your choice. Once the filter is activated, if a match is found, all you need to do is press CTRL and select the correct match to insert it. Never copy-paste again!
To add those filters to MemoQ, follow these steps:
1 – Go to Resource Console => Auto-translation rules
2 – Click on Import New and add the MQRES file
3 – You’re done! Don’t forget to add it to your projects through Project Settings => Auto-translation Rules and/or set it as a default resource.
Auto-translate filter to automatically add non-breaking spaces in FR number format (including before %)
Convert certain types of extra symbols (such as m3, CO2, etc.) and French ordinal indicators (1er 2e etc.)

Auto-translate (almost) any emoji* or special unicode character (such as •):
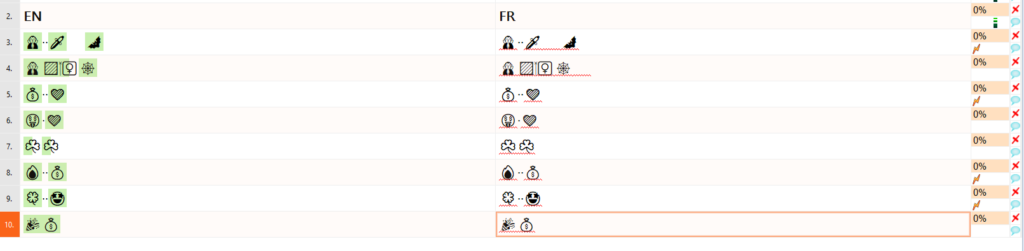
*Most fonts do not support emoji display by default, and will show up as squares. However, they will retain their correct formatting once exported. If you want to see them in MemoQ, select the Segoe UI Emoji font in the Appearance settings.
Auto-translate any date:
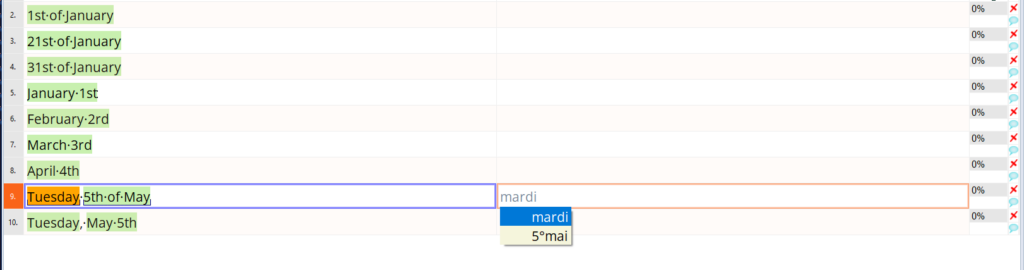
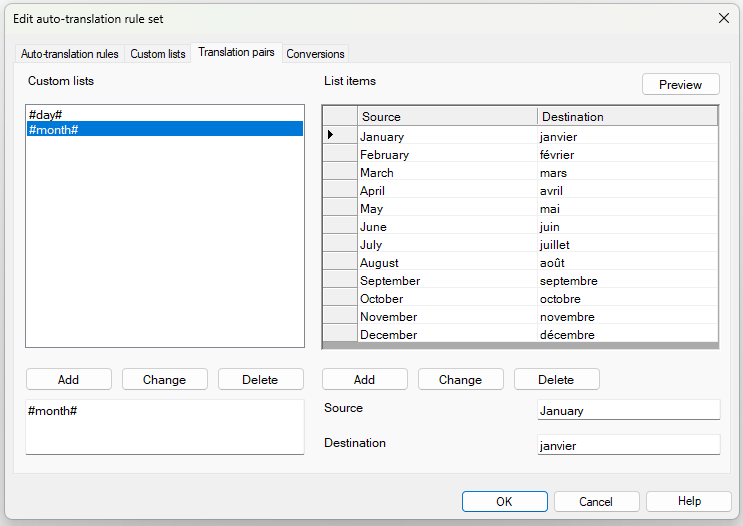
This filter automatically matches and convert any English date format into French. To adapt it into other languages, open the filter settings => Translation pairs tab and edit the each term as needed:
QueriaTMX
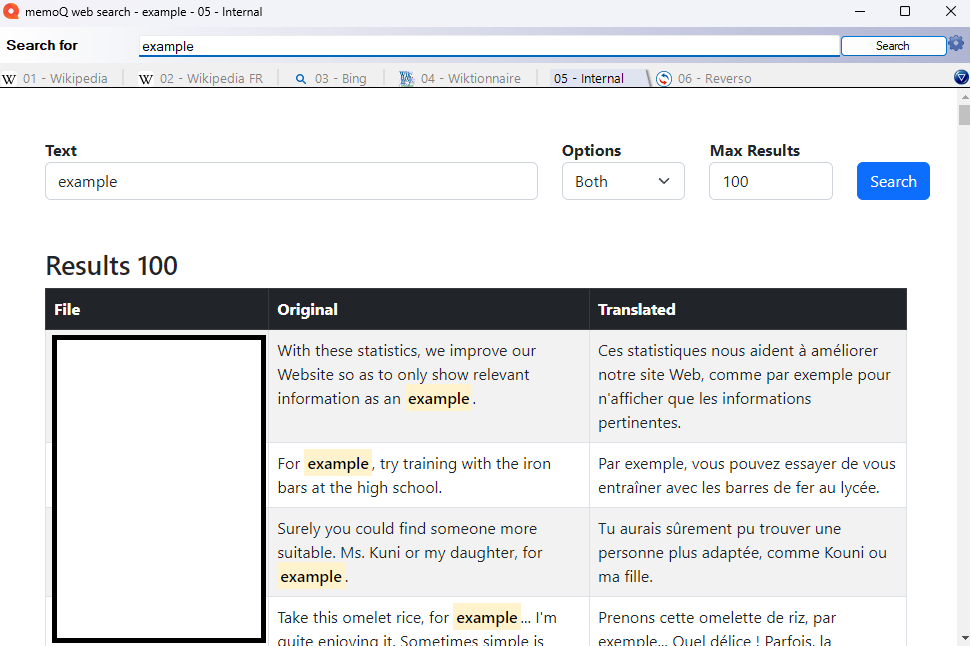
QueriaTMX is a lightning-fast PHP application for your TMX files created by my friend Josh Freeman, that can be integrated in any browser or tool that supports web queries (such as MemoQ Websearch) basically making it a sort of corpus-wide Concordance tool!
QueriaTMX was originally designed for my specific needs, but as some of my colleagues also expressed interest in the tool, Josh graciously open-sourced it. Check it out on Github: https://github.com/vekien/QueriaTMX
Macro Emporium
Here’s a compilation of VBA macros I’ve used during my projects. If you’re unfamiliar with VBA, here’s how you can run any of the macros listed below:
- Open the Visual Basic Editor (Alt + F11) in Excel
- Insert a new module (Insert > Module)
- Copy and paste the code into the module
- Select the cells you want the macro to apply to
- Run the macro from the Developer menu
Macros can be harmful, so always make sure you trust the source and never run random code you found online!
Merging multiple Excel tabs in one
Lockits can be very messy, and performing imports for certain actions (such as creating a TM from existing data) can be time-consuming when said data is spread across dozens of tabs. To that effect, the following VBA macro consolidates all the data from multiple tabs into a single tab. Follow the steps:
- First off, you must ensure that all the data is in the same order across all tabs: for example, column A is always English, column B is always French, and so on.
- Save a copy of your lockit as XLSM (Excel Macro-neabled format)
- Open the copy and go to Developer > Visual Basic
- In the Visual Basic Editor, go to Insert > Module
- This will open a blank window, in which you can paste the following code:
Click here to display code
Sub ConsolidateTabs()
    Dim destSheet As Worksheet
    Dim lastRow As Long
    Dim lastCol As Long
    Dim srcSheet As Worksheet
    Dim destRow As Long

    Set destSheet = ThisWorkbook.Worksheets.Add
    destSheet.Name = "Consolidated_Data"

    ' Initialize the destination row counter
    destRow = 1

    For Each srcSheet In ThisWorkbook.Worksheets
        If srcSheet.Name <> destSheet.Name Then
            lastRow = srcSheet.Cells(srcSheet.Rows.Count, 1).End(xlUp).Row
            lastCol = srcSheet.Cells(1, srcSheet.Columns.Count).End(xlToLeft).Column

            srcSheet.Range(srcSheet.Cells(1, 1), srcSheet.Cells(lastRow, lastCol)).Copy _
                Destination:=destSheet.Cells(destRow, 1)

            destRow = destRow + lastRow
        End If
    Next srcSheet

    destSheet.Columns.AutoFit

    MsgBox "Consolidation complete!"
End Sub
Finally, save the macro and launch it using the play button or F5. You should get the message “Consolidation complete!”, and the consolidated data should appear under a new tab called Consolidated_Data.
Automate line breaks within a cell
Believe it or not, some devs still work with engines/tech stacks that do not support text auto-wrapping. As a result, you need to manually add line breaks in your translations to avoid overflow within a window, which can be tedious when applied to thousands of UI/dialogue lines. This macro automates the process.
Note that in the example below, the limit is set to 42 characters, but you can adapt it to any number of characters by simply replacing “42” with whichever number you want. Moreover, the macro will look for natural break points (such as spaces or punctuation) to avoid trailing signs.
Click here to display code
Sub LineBreak42()
    Dim cell As Range
    Dim text As String
    Dim currentPos As Long
    Dim lastBreak As Long
    Dim nextBreak As Long
    Dim result As String

    For Each cell In Selection
        text = cell.Text

        If Len(text) > 42 Then
            currentPos = 1
            lastBreak = 1
            result = ""

            Do While currentPos <= Len(text)
                ' Find the next break point after 42 characters
                If currentPos - lastBreak >= 42 Then
                    nextBreak = InStrRev(text, " ", currentPos)

                    If nextBreak < lastBreak Then
                        nextBreak = InStrRev(text, ".", currentPos)
                    End If
                    If nextBreak < lastBreak Then
                        nextBreak = InStrRev(text, ",", currentPos)
                    End If
                    If nextBreak < lastBreak Then
                        nextBreak = InStrRev(text, ";", currentPos)
                    End If
                    If nextBreak < lastBreak Then
                        nextBreak = InStrRev(text, ":", currentPos)
                    End If

                    ' If still no break point found, force break at 42
                    If nextBreak < lastBreak Then
                        nextBreak = currentPos
                    End If
                    result = result & Mid(text, lastBreak, nextBreak - lastBreak) & vbLf
                    lastBreak = nextBreak + 1
                    currentPos = lastBreak
                Else
                    currentPos = currentPos + 1
                End If
            Loop

            If lastBreak <= Len(text) Then
                result = result & Mid(text, lastBreak)
            End If

            cell.Value = result

            cell.WrapText = True
            cell.EntireRow.AutoFit
        End If
    Next cell
End Sub
Check character/line limits
As a “companion” to the macro above, you can use the following macro to ensure that no line goes above a certain amount of characters, as well as making sure it doesn’t go over a certain amount of lines total (3 in this example). Before you run it, make sure that the text you want to check is in Column A, and that Column B is empty (as it will be used to generate a report on whether the limits are met or not).
Once again, feel free to adjust based on the character/line limits defined in your project.
Click here to display code
Sub CheckLineLength()
    Dim ws As Worksheet
    Dim lastRow As Long
    Dim text As String
    Dim lines() As String
    Dim i As Long
    Dim resultColumn As Long

    Const MAX_CHARS As Long = 42
    Const MAX_LINES As Long = 3
    Const RESULT_HEADER As String = "Length Check"

    Set ws = ActiveSheet
    lastRow = ws.Cells(ws.Rows.Count, "A").End(xlUp).Row
    resultColumn = 2 ' Column B

    With ws.Cells(1, resultColumn)
        If .Value <> RESULT_HEADER Then
            .Value = RESULT_HEADER
            .Font.Bold = True
        End If
    End With

    ws.Columns(resultColumn).ColumnWidth = 25

    Application.ScreenUpdating = False

    For i = 2 To lastRow
        text = ws.Cells(i, "A").Value

        ' Clear previous formatting
        With ws.Cells(i, resultColumn)
            .ClearContents
            .Interior.Color = xlNone
        End With

        ' Skip empty cells
        If Len(text) = 0 Then
            ws.Cells(i, resultColumn).Value = "Empty cell"
            GoTo NextRow
        End If

        lines = Split(text, vbLf)

        If UBound(lines) + 1 > MAX_LINES Then
            With ws.Cells(i, resultColumn)
                .Value = "Error: More than " & MAX_LINES & " lines"
                .Interior.Color = RGB(255, 200, 200)
            End With
            GoTo NextRow
        End If

        Dim j As Long
        Dim currentLine As String
        Dim maxLineLength As Long
        maxLineLength = 0

        For j = 0 To UBound(lines)
            currentLine = lines(j)
            If Len(currentLine) > maxLineLength Then
                maxLineLength = Len(currentLine)
            End If

            If Len(currentLine) > MAX_CHARS Then
                With ws.Cells(i, resultColumn)
                    .Value = "Error: Line " & (j + 1) & " > " & MAX_CHARS & " chars"
                    .Interior.Color = RGB(255, 200, 200)
                End With
                GoTo NextRow
            End If
        Next j

        With ws.Cells(i, resultColumn)
            .Value = "OK (" & (UBound(lines) + 1) & " lines, max " & maxLineLength & " chars)"
            .Interior.Color = RGB(200, 255, 200)
        End With

NextRow:
    Next i

    Application.ScreenUpdating = True
    MsgBox "Line length check complete!" & vbNewLine & _
           "Checked " & (lastRow - 1) & " rows.", _
           vbInformation, "Check Complete"
End Sub
Finally, you can filter errors by going into Data > Filter and tick “Error:” lines. Hopefully you won’t have anything to fix manually, but better safe than sorry 🙂
Miscellaneous
External Links
Other tips
Use mass-replace as an auto-propagate alternative:
