
Over the last couple of years, I have published a series on LinkedIn titled “Did you know?“, which provides tips about some of the lesser-known MemoQ features that can improve your productivity. However, those posts have the tendency of getting buried in a sea of social media updates, so I’ve decided to re-compile them here for your convenience. Enjoy!
Quick Access Toolbar
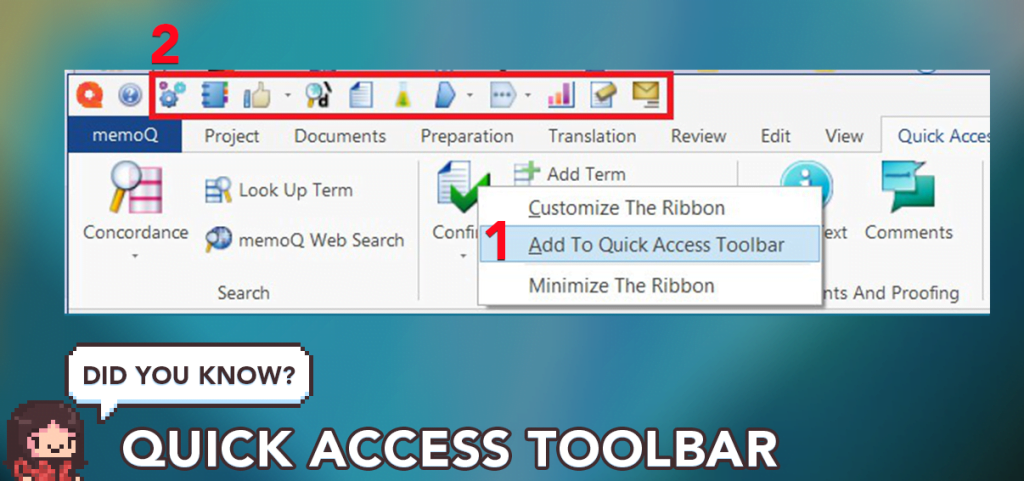
A MemoQ feature that we don’t talk often enough is the Quick Access ribbon – think of it as your own personal menu, that you can customize with all the functions you use on a regular basis. Here are some of my favorites:
- QA – A must-have for any file or project: never deliver without fixing QA issues or marking them as ignored.
- Regex editor – If your tags aren’t already filtered, the Regex editor allows you to apply existing filters or apply new ones.
- Jump to segment – When using filters, I often use this to jump back and forth between segments. Beats using the mouse to scroll!
- Tag filtering – Have you ever worked on projects where tags are literally walls of text? This allows you to quickly switch between long and short versions of tags for easier parsing.
- Tag commands – More tag options. Add, remove or edit them at will!
- Statistics – You know those pesky 500-word limits for App Store pages? Yeah, never open a 3rd party word counter again.
- Clear translations – Does your PM like to assign you files full of garbage patched matches? Get rid of them in one fell swoop!
- Deliver file – Self-explanatory 🙂
Do you use the Quick Access ribbon? Which functions did you add to it?
Centering Active Segments
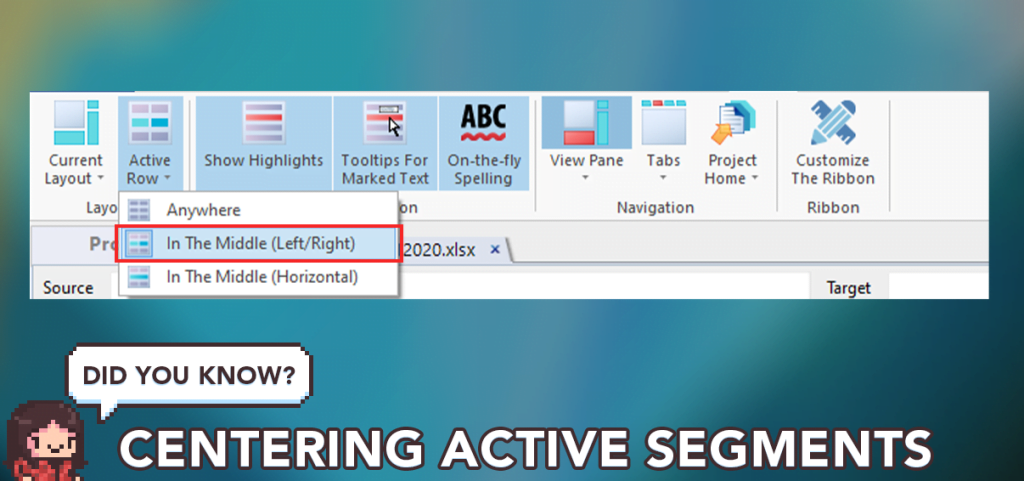
I’ve been looking for this #MemoQ function everywhere, so now that I found it, might as well share! Did you know that you can center the active segment to prevent endless scrolling back and forth? Simply go to View > Active Row > In The Middle (Left/Right) and your active segment will always be right in the center of your translation editor.
MemoQ Web Search
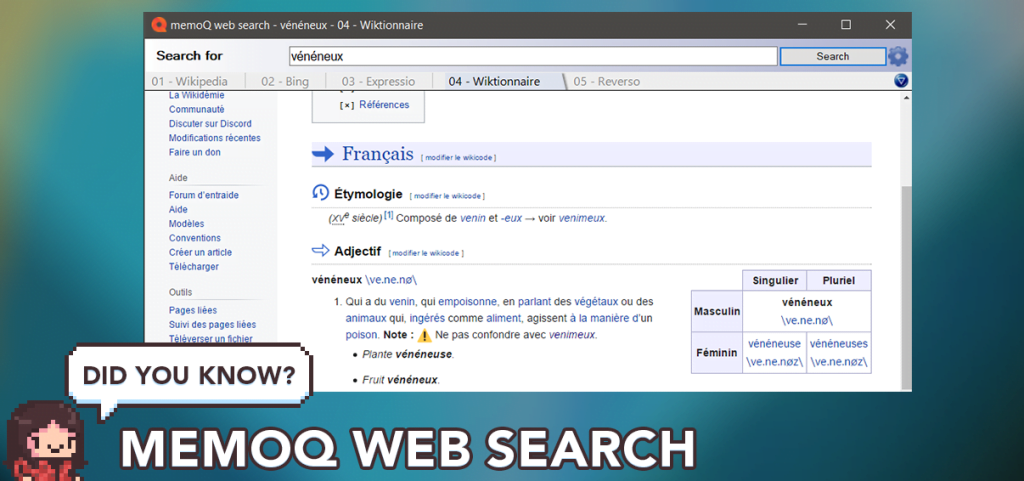
One of the MemoQ features I use on a daily basis is the Web Search tool: with one click, I can run dozens of different queries from different sources, both for my source and target languages, without having to open various browser tabs. Have you tried it yet? If not, here’s a quick rundown:
1. Download my custom EN/FR settings: https://lnkd.in/eHP-PSzE
2. Go to MemoQ options ➡️ Default Resources ➡️ Web search
3. Right-click ➡️ Import New
4. Select the MQRES file you downloaded
5. Click the checkbox if you want to add it as a default resource
6. In a translation project, highlight any word and press CTRL + F3 to display the search results!
Of course, you can customize those settings however you prefer, this is just for the purpose of the demo. This filter is configured for Wikipedia, Bing pictures, Expressio, Wikitionaire (FR) and Reverso (EN-FR).
Advanced Views
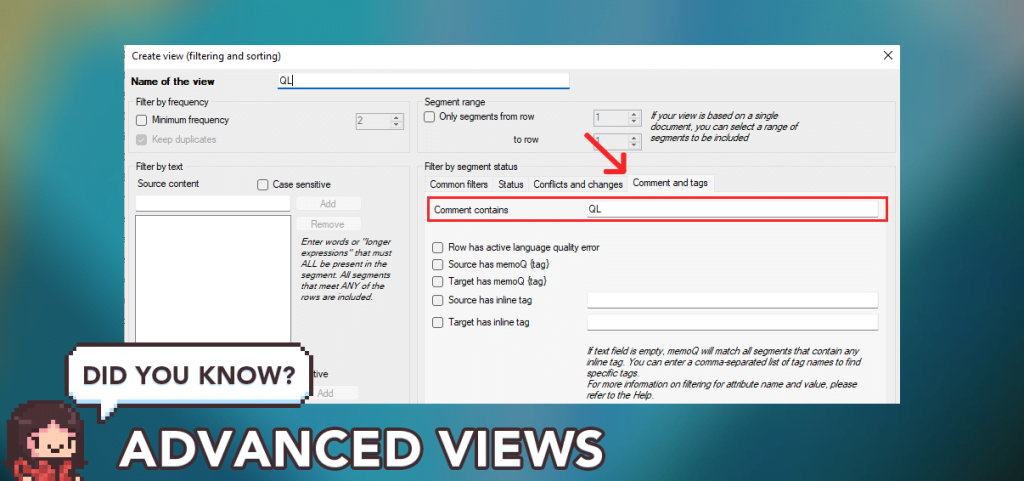
On MemoQ, when a file already has pre-imported comments and you add your own comments (or “highlights”) on top, they both show as “Comments” in the filter, regardless of type. Here’s how to isolate your own comments using the Advanced View feature:
1. When commenting, make sure to always use the same identifier (in my case it’s “QL”, or Query List).
2. Once you’re done, right-click the file and select Create View.
3. Give it a name and go to Advanced Options.
4. Open the “Comment and tags” tab, and in the “Comment contains” field, add your identifier.
And voilà, you’ll have a clear view of all the segments that need to be reviewed later on!
Removing Excel Inline Formatting
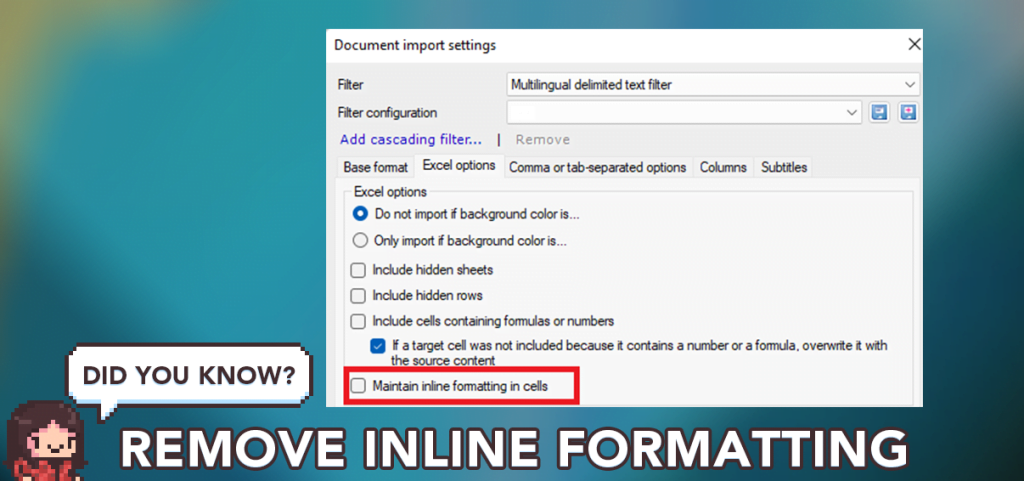
Have you ever had a client who just loves to send you source texts full of colors, highlights, and other RPR-type tags that are not required for the translation? If you import those Excel files with the default filter, chances are you’ll end up with this kind of tag soup:
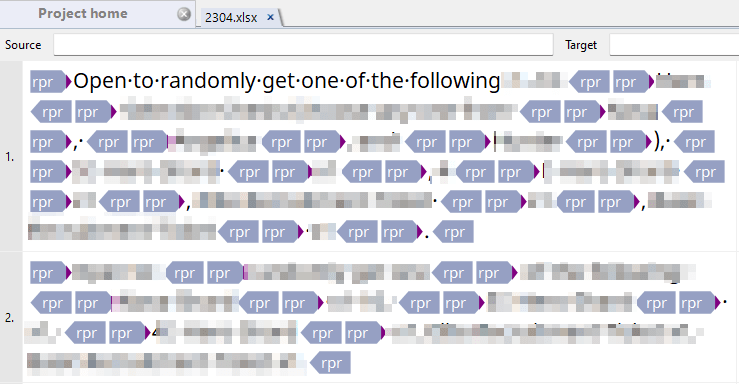
Of course, you could go the long way around and delete the formatting in Excel before importing the file, but in my experience, it doesn’t get rid of all of them. Thankfully, MemoQ can handle that for you with this one simple trick!
To do so, follow those steps:
1. Select “Import with Options…” and pick the source file.
2. Select “Multilingual Delimited Text Filter”.
3. Go to the “Excel Options” tab (as shown in the picture above).
4. Untick the “Maintain inline formatting in cells” box.
This will remove any and all kinds of Excel formatting while preserving it in the source column! You can also learn more about different types of tags here: Link
A big thanks to Jessica Amoruso for her insights on the topic!
Quick Project Switcher
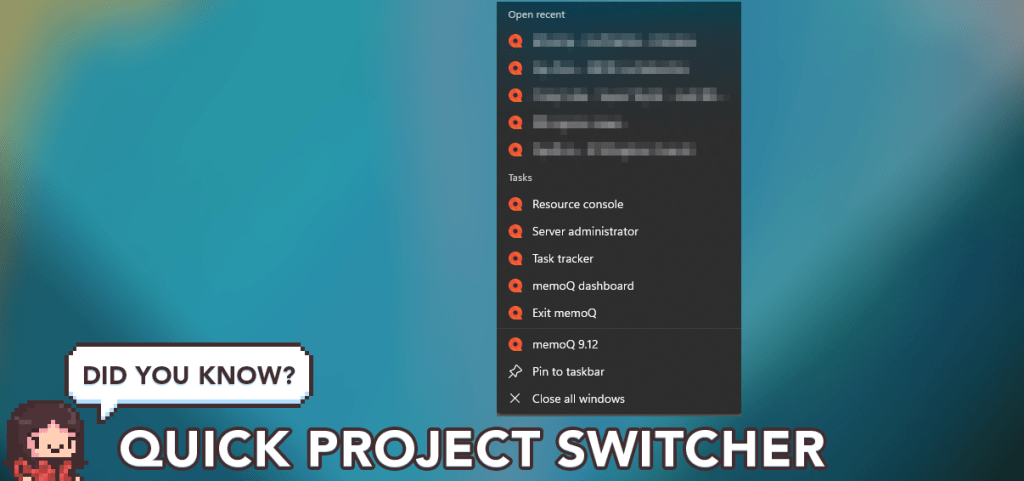
If you work on many projects throughout the day, whether locally or on MemoQ servers, you’ll likely have to switch back and forth between them regularly. This can sometimes be inconvenient if your translation dashboard is filled with projects that you are not actively working with.
Thankfully, you can open recent projects and even pin them simply by right-clicking the MemoQ icon in your Windows taskbar! To pin a project, simply hover on the title and click on the pin icon. The best part? Using this feature allows you to switch immediately between projects without going through the dashboard!
Statistics Tool
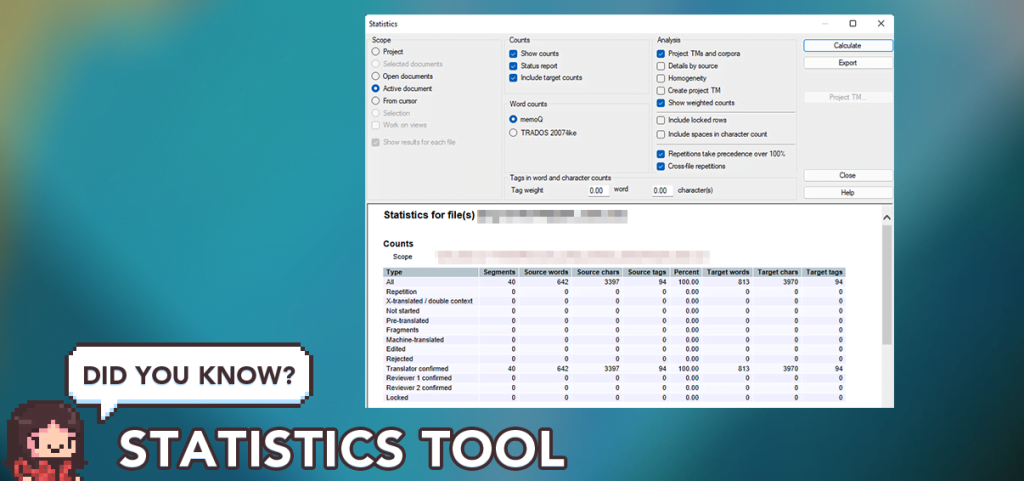
Translation is a number game, and the Statistics tool is all about raw numbers. This allows you to know exactly how many words are included in a project/document/view, how many of those are Fuzzy matches, as well as a ton of other options that give you a precise idea of what your files are made of.
I use the Statistics tool for my translation quotes (you can generate an XLS export by right-clicking the results window) but also to calculate some character limits: if you’ve ever had to translate a Google Play store description, you’ll know there are strict character limits across the entire description (usually 500 per entry), but they aren’t restricted to a single segment. By selecting the relevant segments, you’ll be able to have a clear idea of if your translation will fit.
You can access the Statistics tool in your Project Home, or in the Documents menu if you have a file/view open.
Appearance Tweaks
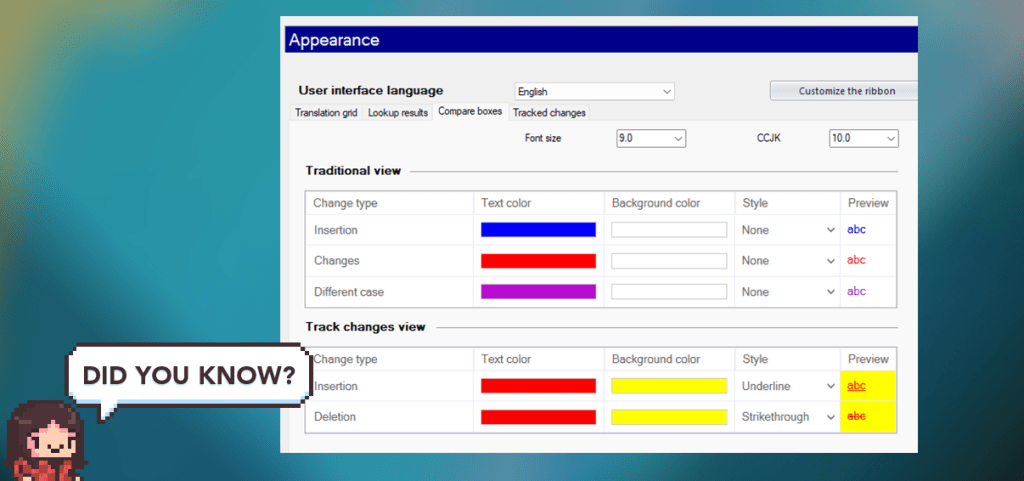
Considering how much time translators spend in front of their CAT tools, maximizing visual comfort should be one of your priorities. In order to maximize efficiency, I usually recommend using a font that is easy on the eyes (Google Noto Sans is my personal favorite) and adapting the font size to your eyesight and display resolution.
Additionally, I highly recommend adding a bright background color to the “Track changes view” as shown above, in order to display changes more prominently when the changes are minor (thanks for the tip, Thomas!):
Don’t hesitate to fiddle with the Appearance settings (Found in Main menu > Settings > Appearance) to find what’s best for you! If you don’t like the results, you can always revert changes with “Reset these settings”.
Using Regex for QA
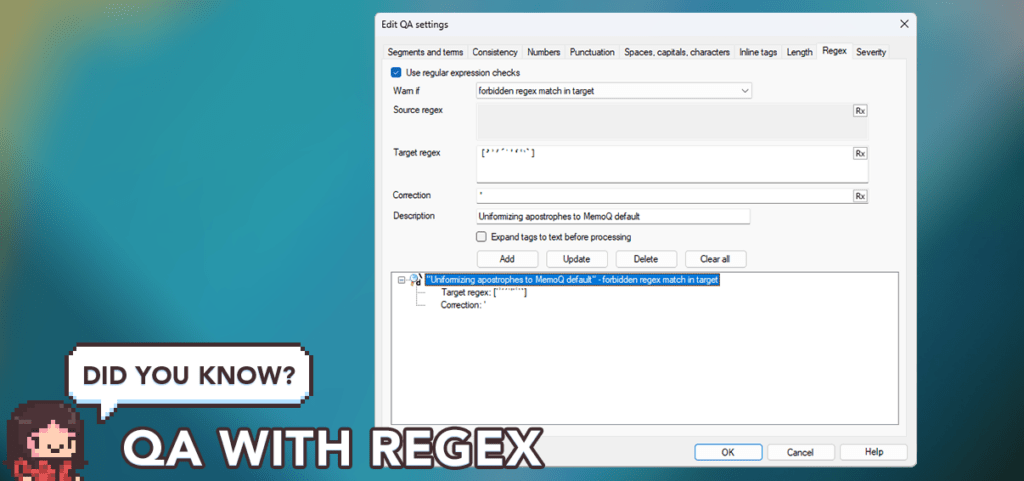
Most advanced MemoQ users are aware of the Regex filters, which can be used for a variety of things: from automatically tagging out untranslatable content to filtering new imports and more. But did you know that you can also use it to make sure unwanted characters don’t show up in QA?
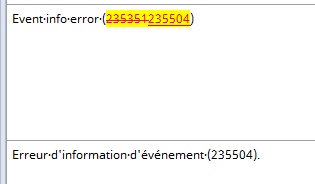
As shown in the example above, there are over 10 different types of apostrophes in French alone, and not all CAT tools use the same one by default (hell, even MemoQ Web and MemoQ client aren’t consistent). Since this character can be a bit difficult to distinguish visually, I’ve created a QA filter that automatically warns me when non-standard apostrophes are included in the target field using the following Regex pattern:
[’ʾ′'ˊˈꞌ‘ʿ‵ˋ]
Of course, this is not limited to apostrophes. You can add all kinds of characters using the same method (I’m using it to filter out Asian punctuation signs such as 【 】, 《…》or ※).
Filtering Through Tags
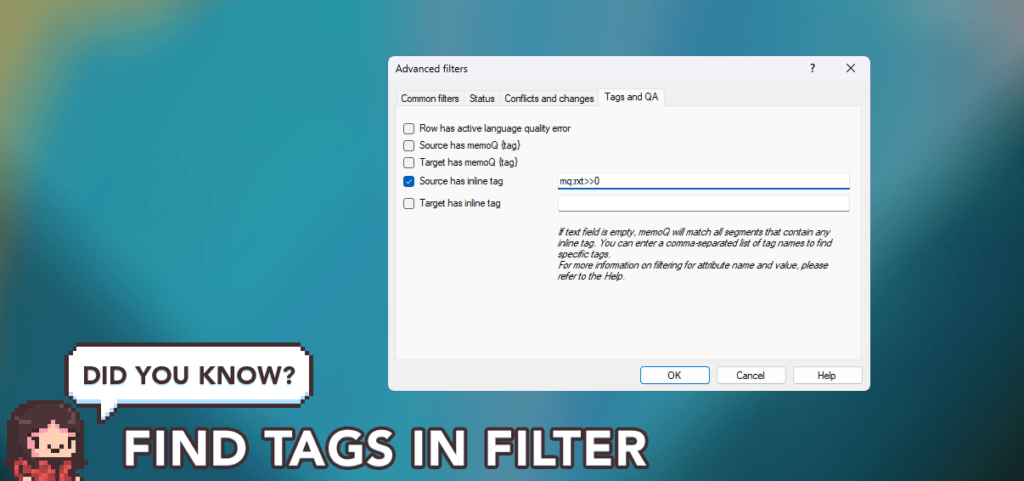
MemoQ offers a wide array of filters and sorting options, which can be a lifesaver when working on large, unorganized files. By default, however, you can’t filter tag content through the basic Search feature – you need to use the Advanced filters option. And even then, finding what you’re looking for is not as easy as it seems.
Since every type of tag is its own distinct entity, they needs to be filtered accordingly. Thankfully, 99% of the MemoQ tags generated through the Regex tagger can be found with the following:
mq:rxt>>0In this example, simply replace “0” with the content you’re looking for in the source, target or both, and you’re off to the races!
With Advanced Search And Replace, you can also use Regex to look up tags based on various criteria :

The example above looks for any tag containing 5 or more digits:
<mq:rxt displaytext="(.*?\d{5,}.*?)" val="\1"\s?/>
If you’d like to learn more about tags and their properties, I highly recommend you check the related page on MemoQ’s documentation.
Shoutout to Valeriy Timchenko for these handy tips!
Opening Trados Packages

Did you know that MemoQ can open Trados translation packages (SDLPPX) and generate return packages (SDLRPX)? As Kevin Lossner pointed out in his Substack blog, those packages are merely ZIP files with a fancy extension and proprietary formatting, which means that even if you don’t have a Trados license, you can process SDL packages directly in MemoQ.
To do so, right-click on a SDLPPX file, select “Open with…” and set MemoQ as the default software. After opening the package, you’ll have to set the target language manually, then define whether the import process should include the TM/TB contained in the package. You’ll also be able to configure the SDLXLIFF filter however you wish (although in most cases, default options should be fine).

Once the package has processed, the files contained within should appear normally. Note that you can also set any additional resource (TMs, TBs, Muses, etc.) just like in any regular MemoQ project. After completing the translation, select the file(s) in the package and right click => Export => Export (Stored Path). This should generate the return package in the form of a SDLRPX file in same folder as your translation package. Note that using “Export (Choose Path)” will not create a return package, so avoid using it unless your PM specifically requests a SDLXLIFF file.
Import Edits from Word
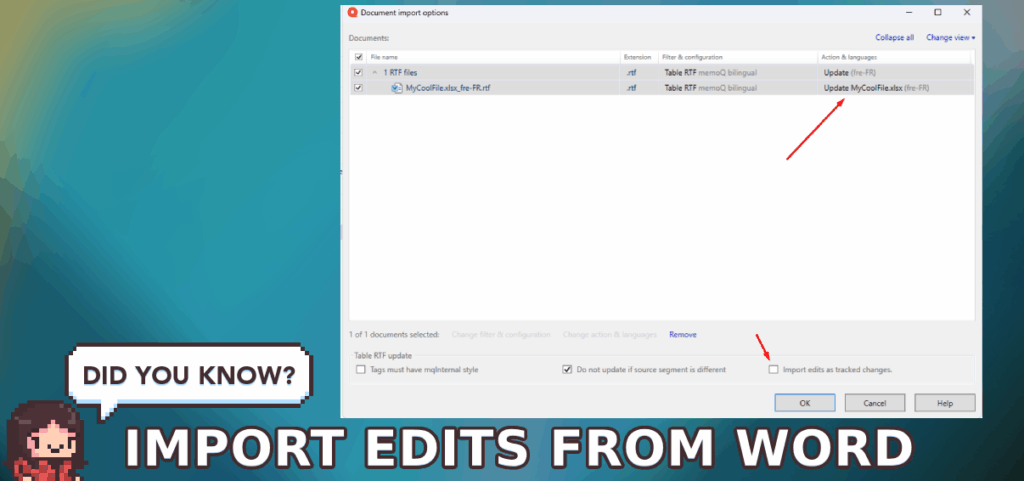
Did you know that you can work with an editor/proofreader who doesn’t own MemoQ (or any other CAT tool), and import their tracked changes directly into your translation window? Thanks to the Bilingual RTF support, you can export a translated file regardless of format, have someone else apply edits in Word, and reimport those edits seamlessly in MemoQ! To do so, follow these steps:
- Right-click the translated file to edit and select Export => Export Bilingual.
- Select the third option, Table RTF, and click Export.
- This will create a RTF file with all source/target segments, as well as your comments (if any).
- Your editor can open this file in Word and edit it, with or without the Track Changes feature turned on.
- Once they’re done, simply drag and drop the file back into the MemoQ project. If the file names match, you’ll be asked to confirm the update, and any edits applied will revert the segments as unconfirmed. I recommend ticking “Import edits as tracked changes” to get a better view of what has been edited.
- From there, you can Confirm or Reject any changes and export the final file.
Add unlimited projects to Quick Access

The MemoQ Quick Access menu is something I’ve mentioned previously on this page, and allows you to switch from one project to the other by right-clicking the MQ icon in your Windows taskbar. By default, however, you can only pin a certain amount of projects, after which your recent projects no longer display. This is partially a Windows restriction, which applies to many other programs like Excel or Word – the difference being that those programs actually support opening multiple projects simultaneously, so you don’t need to swap as much.
If you’re a PM or a linguist constantly jumping between projects, this can be a bit of a hassle. Thankfully, there is a workaround, but it revolves fiddling with the Windows Registry editor. Here are the steps to follow:
- Open the Registry Editor (Windows Key => Regedit)
- Go to the folder: Computer\HKEY_CURRENT_USER\Software\Microsoft\Windows\CurrentVersion\Explorer\Advanced
- Right-click in the folder => New => DWORD_32 Value
- Name this new entry JumpListItems_Maximum
- Double-click on the entry. It should look something like this:
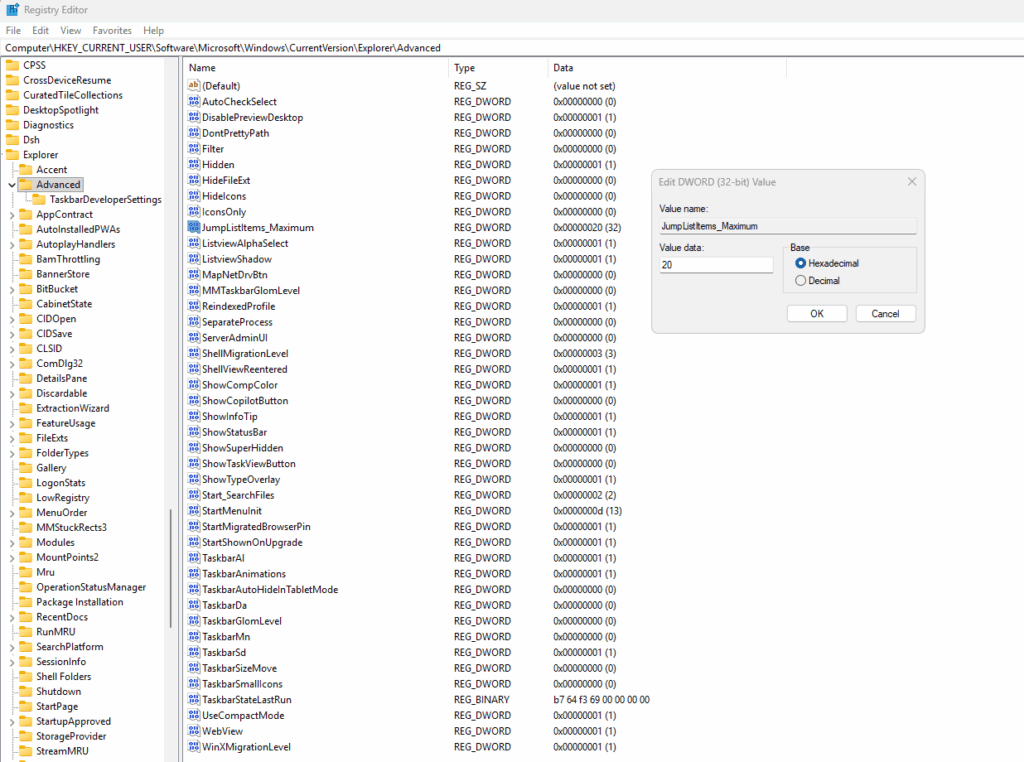
Change the default value to a higher one (I suggest 20 if you have a 4K resolution screen, but the sky’s the limit), and reboot your PC for the changes to take effect. Note that for some reason, you need to have at least 7 items pinned for the others to appear in the list. Here’s how it should look like afterwards:
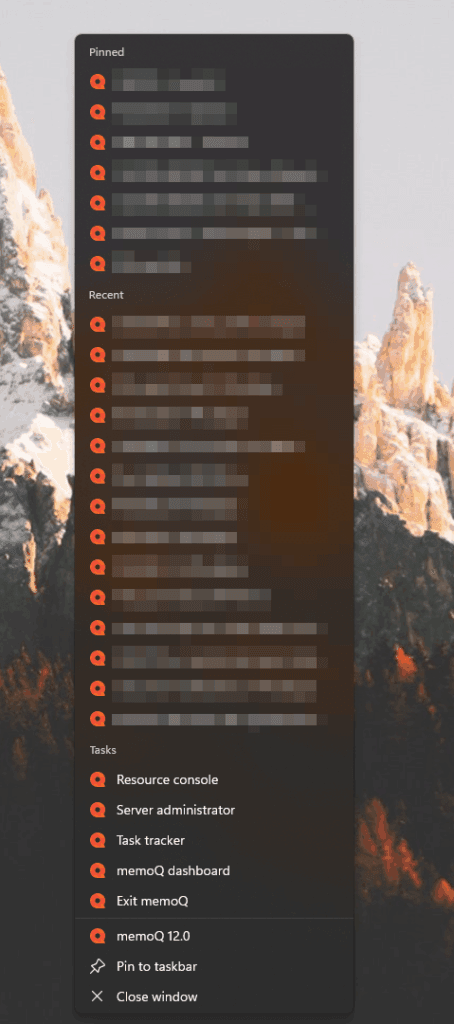
Note: This has only been tested on Windows 11. You can find a more detailed explanation on Jump Lists here.
This page will be updated periodically, but if you’d like to get more tips as soon as they’re published, feel free to add me on LinkedIn – I’m always happy to connect with L10N students & professionals!